You know what surprises most first-time landowners? It’s not the size of the building, or the cost of the materials, or even the permit paperwork. It’s how much the “invisible” work matters—the stuff that happens before the walls look like walls. There’s a reason good builders talk about dirt, drainage, and layout like they’re sacred. One simple statistic puts it in perspective: a single inch of rain falling on one acre of land equals roughly 27,000 gallons of water, a figure commonly cited by the USDA’s Natural Resources Conservation Service. When you picture that much water trying to move across your property, the importance of site prep stops being theoretical real fast.
If you’re planning on building a post frame building—maybe a shop, a barn, a barndominium shell, or that “someday” dream building that finally has a real address—this walkthrough is for you. I’m going to take you through the process the way we explain it at Dutch Builders: plain language, honest expectations, and the kind of detail that helps you feel in control without drowning you in jargon. We’ll cover site prep, post setting, framing sequence, roof installation, inspection milestones, and the alignment checks that keep everything straight and true.
Post and frame construction—often called post frame construction—relies on widely spaced vertical columns (posts) that carry the loads down into the ground or into engineered footings. Instead of a continuous foundation wall like you’d see in many stick-built structures, post frame buildings typically use embedded posts or posts anchored to piers. That design can be efficient, strong, and flexible, but it also means the early phases are absolutely critical. When you’re building a post frame building, the location of every post becomes the skeleton of everything that comes after.
That’s why the process feels like it starts slowly. It’s not slow—it’s deliberate. The first few days can look like “just dirt work” and “just holes,” but those steps decide whether your doors swing right, your roof lays flat, and your building looks crisp instead of slightly… off. And once steel is on the roof, “slightly off” becomes “expensive to fix.”
Before the first post hole is dug, you want to know your land the way a pilot knows a runway. That starts with confirming where the building can legally sit—setbacks, easements, access points, and any utility corridors. If you’re on raw land, you’ll also want to think about how trucks will get in and out without turning your future driveway into a churned-up trench.
Then comes the physical prep: clearing, grading, and drainage planning. Clearing isn’t just removing trees; it’s deciding what stays, what goes, and what roots might cause trouble later. Grading is about more than making things “flat.” You’re shaping water movement on purpose. A good building pad encourages water to move away from the structure, not linger around it.
Compaction is another quiet hero here. If your pad is built up with fill, that fill needs to be placed and compacted properly or it can settle over time. Settlement can show up as uneven slabs, doors that suddenly don’t latch, or a building that feels like it shifted when it didn’t—the ground did. If you’re planning a concrete slab, the quality of the base matters as much as the concrete itself.
A final part of site prep that first-time landowners often overlook is elevation planning. Where will your finished floor sit relative to the surrounding grade? You want the building high enough to stay dry, but not so high you create a steep approach or awkward transitions around doors. This is where builders earn their keep: we’re not just placing a building, we’re helping it live comfortably on your property for decades.
Once the site is ready, layout begins. This is where we establish exact building corners, wall lines, and elevations. It usually involves stakes, string lines, batter boards, and careful measuring. If you’ve never watched a crew square up a building footprint, it can look like a strange dance: measure, mark, pull string, step back, measure again.
Here’s the truth: this is not the time to “eyeball it.” A post frame building is forgiving in some ways, but it’s also brutally honest. If the footprint isn’t square, the roof framing will argue with you. If post locations drift, your wall steel can telegraph those mistakes in waves and misalignments. Layout is the moment where the building’s geometry is decided. We take diagonals, verify corners, and confirm that reference points are protected so nothing gets bumped out of place while equipment moves around.
This is also where we start thinking ahead about door locations, overhead door clearances, and how the building will be used. A shop that feels perfect on paper can feel cramped if door placement and interior flow aren’t considered early—because once posts are set, the building starts making some decisions for you.
With the footprint established, post holes are excavated. The depth and diameter depend on engineering, building height, roof loads, wind exposure, and local frost depth requirements. Soil conditions matter here more than people expect. Some soils stand nicely; others slough and cave in. Some are dense and stable; others are wet or sandy and require special handling.
In many cases, the hole gets a concrete footing at the bottom to spread the load. Then the post is set, and the post is stabilized with concrete backfill, a concrete collar, compacted aggregate, or a combination—depending on design and local requirements.
If you’re building in an area with a meaningful frost line, embedment depth and bearing details become even more important. Frost heave can lift or shift poorly designed foundations. Post frame systems can be engineered to handle this, but only if the foundation portion is treated as the structural component it truly is.
This is one of the most common questions we hear, and it’s a good one. Support posts in post and frame construction can be anchored in a few primary ways.
One approach is embedded posts, where the column is placed directly into the ground on a footing and secured with concrete and/or compacted backfill. When designed properly, embedded posts create a strong connection that resists uplift and lateral forces. The key is proper treatment of the column material, correct hole sizing, and the right concrete and backfill method for the engineering design.
Another approach uses concrete piers or a slab-integrated foundation with brackets, where the post sits above grade and is mechanically fastened to an anchored connector. This can be a great option when you want the wood column isolated from soil contact or when site conditions make embedded posts less desirable. The bracket and anchor system must be engineered so it can resist uplift, shear, and bending forces, and the concrete pier or footing must be sized accordingly.
Which method is “better” depends on the building design, local code expectations, soil, groundwater considerations, and long-term goals. The right answer is the one that meets engineering requirements and fits your property’s reality—not the one that sounds simplest on a forum.
When posts start going in, the site suddenly feels like a building project instead of a dirt project. Each post is placed at a specific location, set to correct height, and braced plumb. Temporary bracing is not optional—it’s what keeps posts from shifting before the structure ties together.
This is also the stage where alignment checks happen constantly. We check plumb with levels, verify heights with lasers, confirm straightness with string lines, and recheck diagonals across the footprint. If a post is slightly out, it can usually be corrected early. If a post is locked into place and the crew moves on, that small error can multiply into framing frustrations later.
At Dutch Builders, this is one of the stages we treat like a “slow down to speed up” moment. The more precise the posts are, the faster and cleaner everything goes from here.
Once posts are set and secured, framing begins in earnest. The lower perimeter framing—often including a treated skirt board or splash plank—helps define the base of the walls and provides attachment points for wall framing elements. From there, wall girts are installed.
As wall framing progresses, the building becomes rigid. Proper bracing, blocking, and fastening schedules matter because the wall system is part of what resists racking forces from wind. This isn’t just about holding up a roof—it’s about staying square when weather tries to twist the structure.
Then comes one of the most satisfying milestones: truss setting. Trusses are typically placed at engineered spacing, aligned, and braced. This is a stage that demands attention and safety. Trusses must be set correctly on their bearing points, restrained properly, and braced per the manufacturer’s guidance and the building design. Temporary bracing becomes a whole system during this phase, because until purlins and permanent bracing are installed, trusses are vulnerable to movement.
After trusses, roof purlins go in, tying the system together and creating the structure that will support roof panels. Once purlins are installed and everything is aligned, the frame begins to feel solid and confident—like it’s done negotiating with gravity.
This is the part homeowners rarely see, but it’s the difference between “built” and “built well.” Throughout framing, we’re verifying three big things: square, plumb, and straight.
Square means corners are true and the building footprint isn’t skewed. If the building isn’t square, roof panels can fight you, trim can look off, and openings can become a headache.
Plumb means posts and walls are vertical. A wall that leans might not be obvious until you stand back and notice the building looks like it’s bracing against a wind that isn’t there.
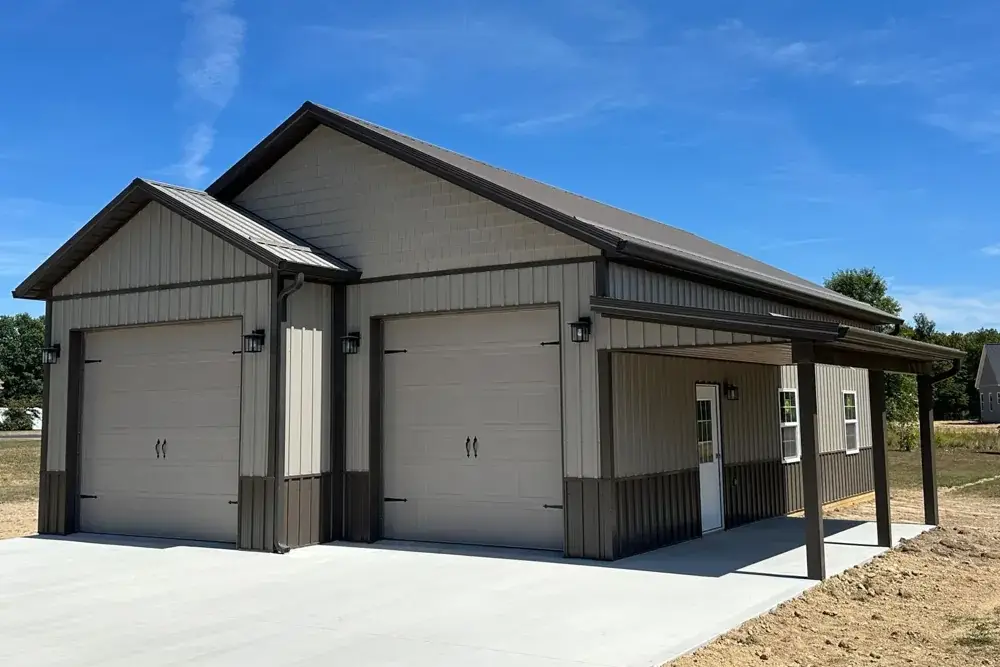
Straight means wall lines don’t bow in or out. With steel siding, straightness is especially important because metal reflects light. Even small waves show up as shadows and ripples, and suddenly that beautiful new building looks “wobbly” in the afternoon sun.
Alignment checks are not one-and-done. They’re repeated as loads change—after trusses are placed, after purlins tie in, and before the roof is fully installed. Think of it like tuning an instrument. You don’t tune a guitar once and then string it up any way you want.
Putting on the roof is a big emotional moment because once the roof is on, the building feels protected. Practically speaking, it also adds stiffness and helps lock the structure together, especially when installed with the right fastening pattern and trim components.
Roof installation usually includes underlayment or a condensation control layer when specified, followed by metal roof panels, ridge components, eave trim, and closures designed to manage airflow and water. Ventilation details matter more than people think, even on “just a shop,” because trapped moisture is relentless. A properly detailed roofline helps reduce condensation issues and keeps the building comfortable and healthier over time.
Roof overhangs, if included, are framed and finished carefully because they’re highly visible and they have to stay straight. This is also where a clean framing job pays off. When the frame is true, the roof panels lay nicely, ridge lines look crisp, and trim details feel intentional instead of forced.
Inspection requirements vary by county and municipality, but most jurisdictions want to verify key stages before you cover things up. In many places, there’s a permit review upfront that may require engineered plans, site plans, and sometimes soil information depending on the project. After excavation, some areas call for an inspection of holes or footings before concrete is placed. Many jurisdictions want a framing inspection once the structural system is in place—posts, beams, trusses, bracing—so they can confirm the structure matches approved plans.
A helpful way to think about inspections is that they’re not just bureaucratic speed bumps. They’re moments where you—and your builder—get a second set of eyes on the work before it becomes hard to see. When inspections are anticipated and scheduled as part of the build plan, they feel like progress markers instead of surprises.
This question comes up constantly, and the honest answer is: it depends on the building size, complexity, crew size, site access, weather, and how many “extras” are built into the design. A straightforward post frame shell with clear access, good weather, and a dialed-in crew can move quickly from posts to a dried-in frame. A more complex structure with multiple overhead doors, overhangs, interior load-bearing walls, or specialty features can take longer.
What I like to tell first-time landowners is this: the best timeline is the one that respects the sequence. Rushing post setting and alignment checks can cost you more time later than it ever saved. The smoothest projects aren’t the ones that sprint at the start—they’re the ones that keep a steady pace and avoid rework.
One of the underrated advantages of post frame construction is that it can be designed with future expansion in mind. Adding length to a building, extending a roofline for a lean-to, or planning a future bay is often achievable, but it works best when the original building is intentionally designed for that possibility.
That means thinking ahead about where future doors might go, whether the endwall can be framed to accept an addition, and how loads will transfer when the structure changes. Roof pitch, truss design, and post layout can either make expansion feel like a natural next chapter—or like trying to add a room onto a puzzle that’s already glued together.
If expansion is even a “maybe someday,” it’s worth talking about up front. Small design decisions now can keep your future options wide open.
If you’re a first-time landowner, here’s what I want you to take away: building a post frame building isn’t mysterious, but it is sequential. Site prep sets the stage. Layout makes the geometry honest. Post setting turns a plan into a skeleton. Framing and alignment checks make that skeleton strong and straight. Roof installation protects your investment and locks the structure into its final, confident shape. Inspections, when anticipated, become milestones you can celebrate instead of hurdles you dread.
And if you want the simplest “builder’s truth” in the whole process, it’s this: the best-looking post frame buildings are usually the best-prepped post frame buildings. When the ground, the layout, and the posts are right, the rest of the project tends to fall into place the way it should—steady, clean, and satisfying to watch.
When you’re ready to move from dreaming to building, we’re here to help you make the process feel clear and grounded, one step at a time—like a good project should.
Let’s talk, plan and build something that feels like home.


